Saturday, May 28, 2011

Summer Gingham Inspiration Board


Summer is almost upon us!
Time for running through sprinklers, picnics in the park, popsicles, frolicking in the pool, and gingham!

A bright gingham wedding or party sounds like a perfect way to celebrate summer.
And, if you decide to have one, pretty pretty please invite me  : )


(Pictures: L to R: Neckties: Etsy, babybystevie | Bouquet: oncewed.com | Cupcake Liners: artfire.com | Table Runner: snippetandink.blogspot.com | Bunting: tabletopsfortotsblog.com)

Wednesday, May 25, 2011

How to Write Thank-You Notes


Somewhere between childhood's chore of sitting down to write a thank-you on bright colored paper to the ease of just shooting off an email, we forgot etiquette's art of writing a thank-you note.  And grandma is not pleased.  Now that you are a grownup, an email will not do, and more is expected out of you than, "Thanks for the present, you rock!"

Thank-you note-writing is a lovely tradition that has been near-forgotten in this information age.
So, let's revive a little gracious living, shall we?


1.  Be Timely


A thank-you note should be sent within two weeks of the engagement party or shower and eight        weeks upon returning from the honeymoon.


2.  Be Personal

Do not say, "Thank you for the blender."
Rather, express genuine gratitude:  "Dear Bill and Susan,  It was wonderful seeing you at our wedding!  The blender you gave us was such a thoughtful gift...."


3.  Mention Past, Allude to Future


Express the joy of the receiver's presence at your wedding.  Also, tell them of how you plan to use the gift in the future.
"The coffee maker will prove to be a wonderworker for Brad in the mornings--you know how he needs his coffee!  Thank you for thinking of my sanity."


4.  Send Note for Number of Gifts Received


If Aunt June sends you a gift for you engagement, bridal shower, and the wedding, send her three notes--one for each gift.


Now, get it in the mail.

Thursday, February 17, 2011

Popular Colors 2011 - Blush Pink

Whether you want the tone of your wedding to say vintage, country-chic, sweet, or romantic, blush pink will work for you. Add this versatile color to your linens, flowers, bridesmaids dresses, invites, and anything else you can get your hands on! It can be well-accented by a multitude of colors, such as cream, gold, lime, navy, tangerine, or the classic black and white. Enjoy!


Wednesday, January 26, 2011

Country-Chic Wedding


    We saw this idea for personalized handkerchief invitations at strictlyweddings.com and loved it! To ensure that all of your handkerchiefs are one-of-a-kind, try searching Ebay for some vintage designs rather than purchasing at a craft store. These are a unique and creative way to invite your loved ones to your country-chic wedding.

    DIY Cork Board: A great way to stick with your theme while also showing off you and your fiancé's personalities. You will need:
    • LOTS of corks
    • Super glue
    • A picture frame

     Lay out your corks on the backing of the picture frame to make sure they all fit.  If they do not, you can adjust the size by using a knife to cut down some of the corks.  Once you have your design laid out and you are sure everything fits, glue down the corks one by one.  Let your board dry, then stick the backing in the frame. Add some pictures and your board is complete!


    Rice/favor holder from weddingmatters.com 

    Thursday, December 2, 2010

    Give and Get

    We are running a special on our etsy site, our GIVEANDGET coupon!  When you purchase anything from our shop, you GET 10% off your entire order.  AND, we GIVE $10 per item to Hope for Kenya!

    Hope for Kenya is a non-profit organization that raises money to hold Christian camps at the Challenge Farm orphanage in Kenya.  We love supporting this organization and we hope that you will help by visiting our shop.  http://www.jubilationevents.etsy.com/!

    Tuesday, November 16, 2010

    DIY: Chalkboards

    Fun new trend for weddings…Chalkboards. Whether you have a chalkboard theme or just want to use chalkboards as a fun detail, here are some ideas you can incorporate.
     use a chalkboard in your engagement photos (Save the date…, Future Mr. and Mrs.)

     chalkboard wedding and reception welcome sign to point your guests in the right direction

     small chalkboards can be used to label different areas of the reception (gift table, photobooth)

     large chalkboards can be used as menu boards; you can list courses or available finger foods (small boards can be used on the food table so guest know which finger food is which)

     chalkboards can be used to notify guests of their seat assignments as well as table numbers

     small boards (3.5x5 or smaller) with guests names and table numbers

     large boards can be used to list guests and their table assignments

     tables can be numbered using larger boards (5x7 or larger) on stands or smaller boards (4x6) integrated into the centerpieces

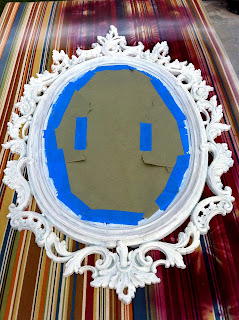
    DIY: We took a few different shapes of mirrors and old paintings and turned them info chalk boards. Here are a few pics of the transformation!


    This is the original mirror.  First we taped off the mirror portion to prime and paint the frame.  We used spray paint so that we could get into all the little tight spaces.


    Once that was dry, we primed and painted the chalk surface.  We used chalk board spray paint from our local Home Depot.  The primer was one that the paint associate recommended.  The grey helped with coverage of the black chalk board paint.

    This is the finished project!  We made a bunch of different shaped boards, hung them from shephards hooks down the ceremony aisle with a love poem written on them.  It was super cute! (and, it was a long aisle!)
    Our friends at T&J Studio's took pics, so when they are done, we will put one up here for you!